
In Part 1 of this blog, we introduced you to Screencastify and discussed the application of both the SAMR Model and the Triple E Framework to help you integrate Screencastify into your instruction. Today’s post offers detailed instructions about how to use this tool and also shares classroom use ideas by subject.
How to Use Screencastify:
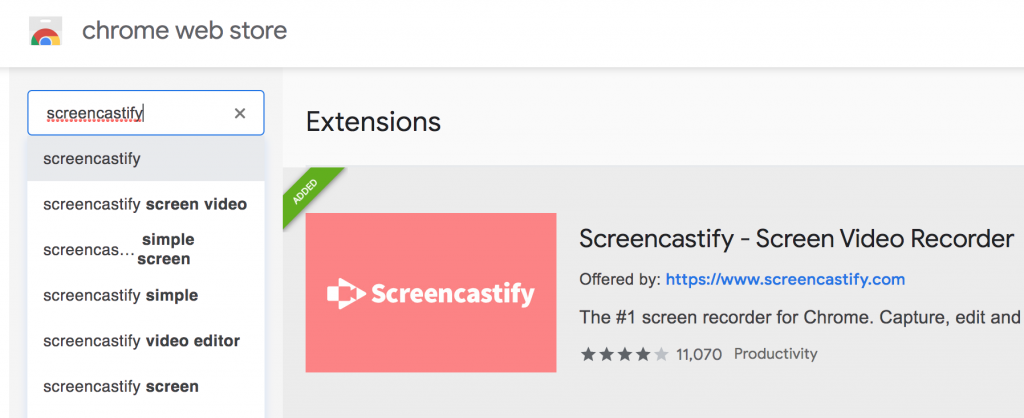
To start using Screencastify, you will need to add the extension to your Chrome browser by searching it in the Chrome web store.
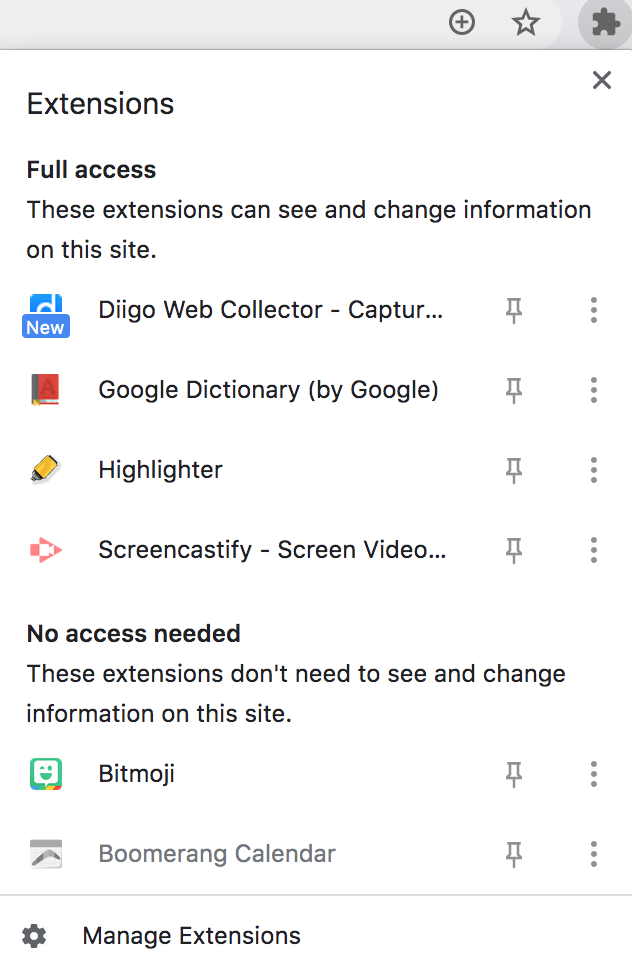
Once the extension is added, it will be in your toolbar in the area that you keep your extensions (marked by a puzzle piece icon).
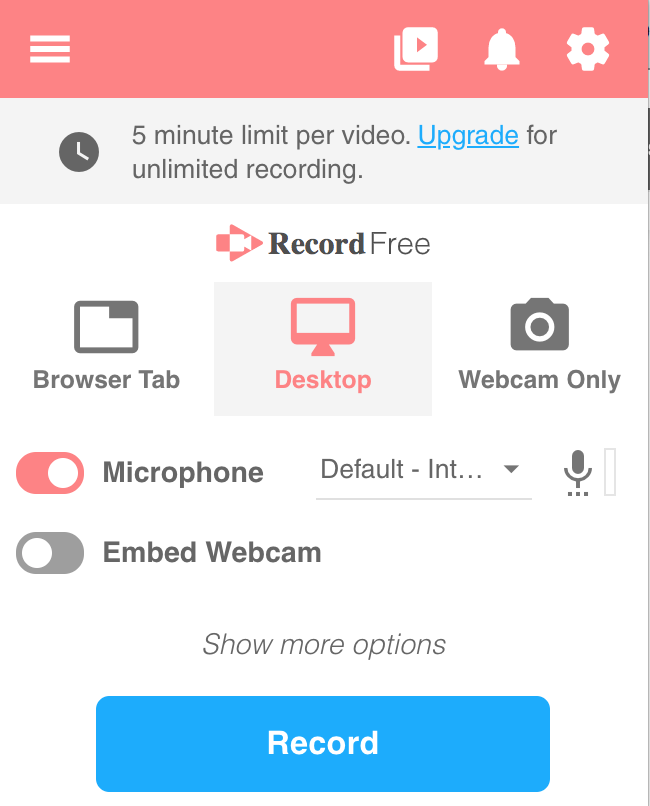
When you are ready to begin your screencast, go to your extensions menu and click the icon to use Screencastify. Remember that this free version offers you five minutes of recording. (Hint: if you need additional time, break your lesson into parts and chunk the information. This is great for scaffolding your teaching and makes it easier if kids need to watch specific parts again—they don’t need to view the longer video, just the relevant five-minute section).
You have the option to show your browser tab only, your entire desktop, or your webcam only in your screencast. This offers great flexibility in how you want to present content or how you want your students to show what they know. You will also need to enable your microphone and have the option to embed your webcam. This is a great feature if you want your students to see your face while you are demonstrating the new skill or web tool. This is especially effective with younger students—seeing their teacher’s face may help them remain focused throughout the screencast. When you’re ready, simply click Record!
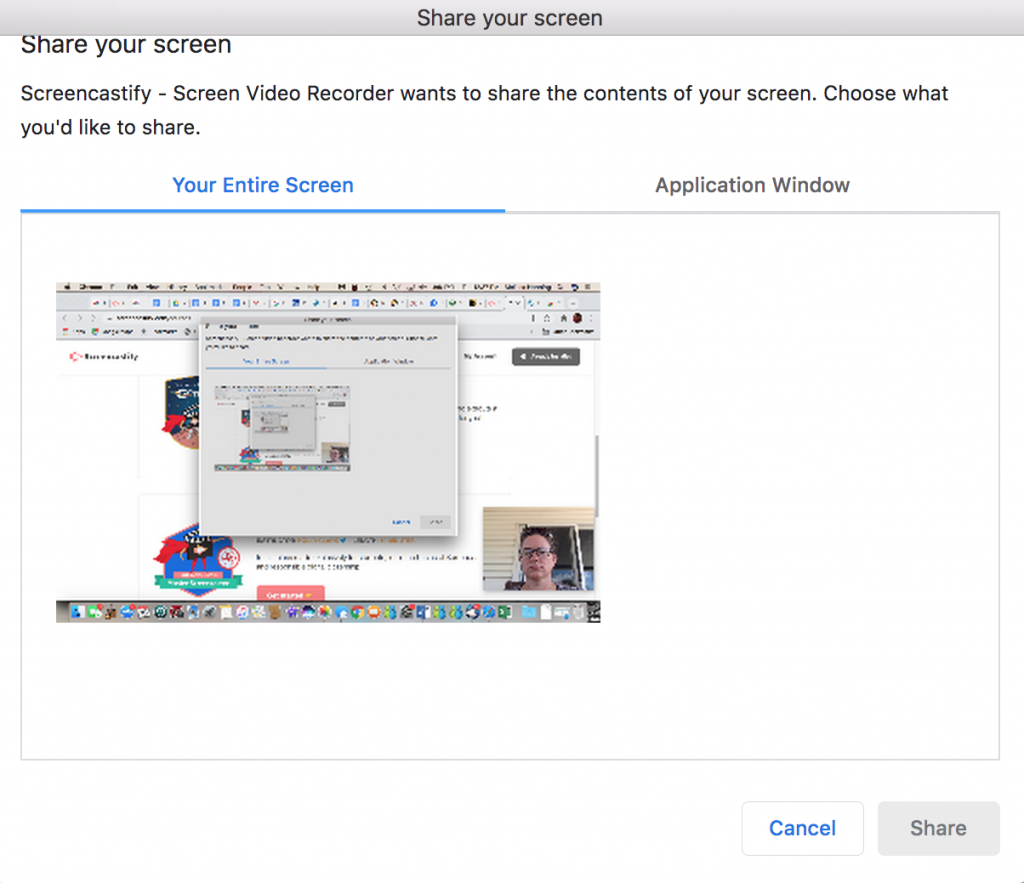
Once you hit Record, you will be prompted to share either your entire screen or the application window. When ready, hit Share, and in 3-2-1, your screencast will begin!
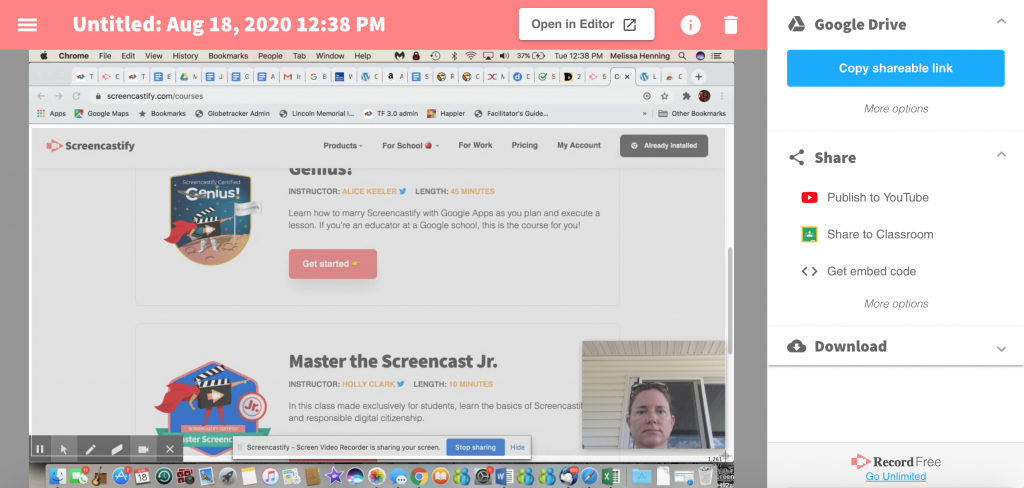
This is the view you’ll see while you are recording. Notice the option at the bottom of your screen to stop sharing. You will get a warning when your time is almost up and nearing the five-minute mark.
Once you’re finished, you’ll see this view. You have even more options, such as renaming, sharing, or cutting the recording. We’ll go into further details below.
Click the title to rename your recording. Also, note the cutting options at the bottom.
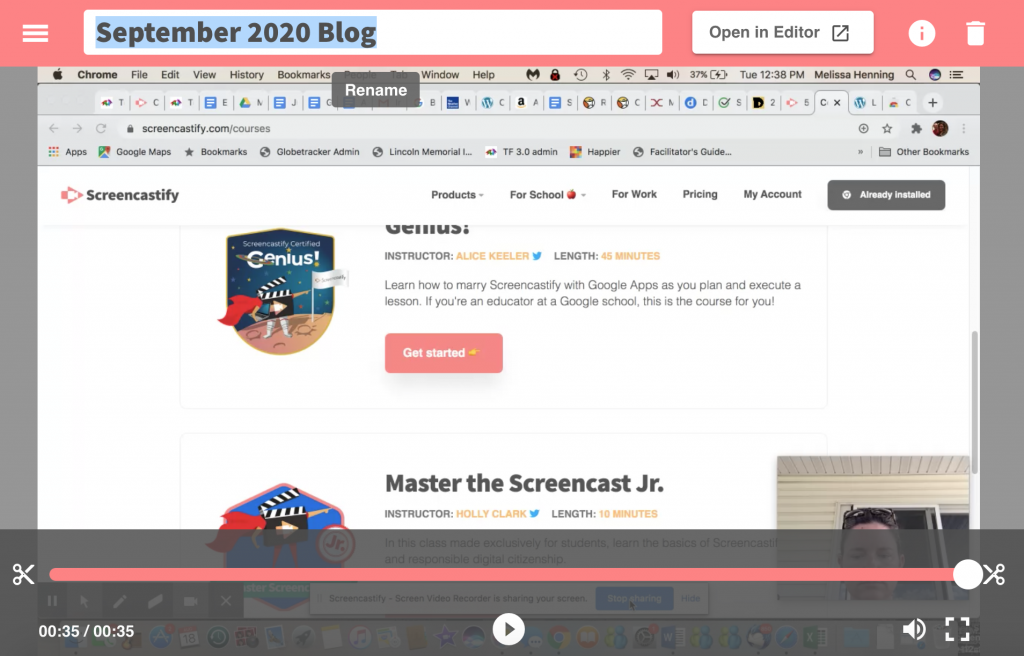
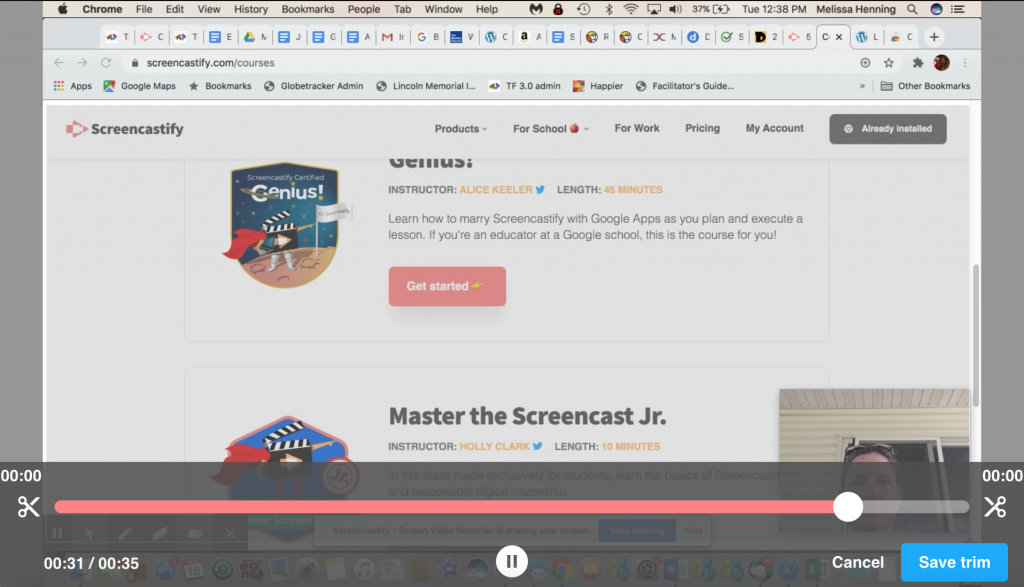
To edit the length (especially helpful if you go over by a few seconds), you can click and drag the scissors to cut down parts at the beginning or end.

Once you are finished, click Save trim.
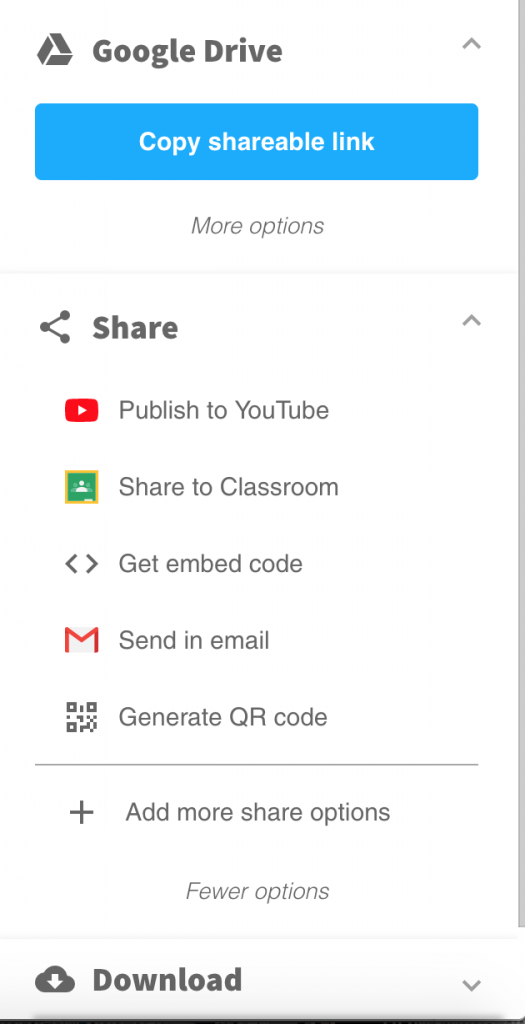
Now you are ready to share your finished screencast! You have many options to share on Screencastify, but the best part is that the screencast is automatically saved in your Google Drive, so all you have to do is click to copy the shareable link. You also have the options to publish to YouTube, share to Google Classroom, get an embed code, send via email, or generate a QR code. Click on the sharing option of your choice, and you’re ready to go!
Classroom Use Ideas:
Screencastify allows teachers and students the ability to create quick and simple screencasts on a variety of topics. Teachers can use screencasts to introduce themselves to the class, review classroom (or virtual classroom) rules, explain daily or weekly procedures, and so much more. While in-person teaching has many advantages, using screencasts to share lessons gives students the ability to replay for deeper understanding. Screencasts can also be used to share classroom procedures and daily plans with substitutes or for professional learning during in-service training. Students can create screencasts to show what they know in nearly any subject area. They can also use screencasts to introduce themselves to the rest of the class.
Teachers and students can create screencasts about…
Social Studies:
- Various locations on a map, including continents, lakes, oceans, and cities.
- Current news articles and events.
- Images or virtual tours of famous landmarks.
- Websites explaining the election process.
- How to use various interactive websites related to historical topics.
- Information about famous leaders, presidents, and others who have made a difference.
- Images related to the Revolutionary War.
- Creating “news broadcasts” sharing current events. Students can create these alone, or, if they’re in the classroom, could collaborate and interview each other about the topic. They can create the news story in the classroom (using a green screen) or on their own during remote learning and share through Google or a URL.
Science:
- An interactive lecture explaining the steps of the Scientific Method or the Engineering Design Process.
- A website sharing the phases of the moon.
- A lesson or presentation about various types of simple machines and their purposes.
- Websites that share virtual animal dissections (perfect for remote teaching).
- Websites related to DNA and traits found in different animals.
- An experiment that they have recorded using a phone or iPad. Once the video is on the computer, students can add their own narration to explain what happened during the science experiments.
- A lesson for biology or chemistry.
- A newly created invention. Share it using the video feature of the screencast, explaining how the invention works and why it is helpful.
Math:
- A lesson introducing a new topic. Use a virtual whiteboard to demonstrate how to write out the problem. After introducing the topic, have students complete a quick assessment to show understanding of the new topic.
- How to use virtual manipulatives.
- How to use various websites related to math practice or enrichment.
- A lesson at the beginning of the year showing your expectations of what it means to show your work in a math problem.
- Using virtual graphing paper to demonstrate how to find area or perimeter. You could also draw different shapes.
- A students’ problem-solving process. Students can share their screencast with teachers and record a brief description, sharing orally how they solved the problem.
Language Arts:
- Various types of poetry. Go further and have students create screencasts sharing poetry that they have created.
- A character analysis about one of the characters from a text being read in class. Since students are creating these outside of the classroom (or outside of lesson hours, if you’re teaching remotely), they have the opportunity to go back and re-record if they are not pleased with their first attempt.
- A lesson about the climax of the story. During the lesson, share a writing prompt with students related to the climax.
- A website about a famous author, highlighting where they’re from, key points in their lives, and other biographical information. Dig deeper and have students create individual screencasts sharing what they learn individually about an author with the rest of the class.
- Reading stories. Teachers can read stories aloud to their younger students (in any subject area) by using a screencast. If five minutes isn’t long enough, split the screencast into parts or read a chapter per day. Reading to your students is a great way to connect with your students in the classroom or virtually!
World Languages:
- Introductions. Have students introduce themselves in the new language. Challenge them to include images, virtual whiteboards, and other online options.
- Lessons demonstrating how to conjugate verbs. Explaining the process as you show students how to do it on your computer screen.
- Pronunciation. Have students create short screencasts demonstrating that they know how to pronounce words. You could have students make a list of 10 things they want to do this school year, explain various family members (in the native language), or even describe a location.
Creative Arts:
- Chorus, orchestra, or band music, so students can hear different melodies and know better how to practice.
- Practicing. Students could create their own individual screencasts playing instruments or singing to share privately with teachers for assessment.
- How to play certain instruments. This is especially helpful for students new to learning the instrument.
Additional Video Tutorials and Articles:
Have you used Screencastify in your classroom or for professional learning? Share your activities in the comments below!